Losing a tooth can be a challenging experience, impacting not only your smile but also your confidence, ability to eat, and even your overall oral health. Thankfully, modern dentistry offers a remarkable solution: dental implants. These innovative tooth replacements are designed to look, feel, and function just like natural teeth, providing a durable and aesthetic restoration. For many, understanding the journey from initial consultation to a fully restored smile can be made much clearer through visual aids. That’s why we’ve compiled this comprehensive guide, enriched with descriptions of dental implants process pictures, to walk you through each step of this life-changing procedure.
If you’re considering dental implants, you likely have questions about what to expect. This article will demystify the process, breaking it down into understandable stages. We’ll explore everything from the initial assessment to the final crown placement and crucial aftercare, giving you a detailed look at the journey through descriptive dental implants process pictures.
Key Takeaways
- Comprehensive Assessment is Crucial: The journey begins with a thorough examination, including 3D imaging, to create a personalized treatment plan for your dental implants.
- Surgical Placement is Precise: A titanium implant post, acting as an artificial tooth root, is carefully placed into your jawbone during a minor surgical procedure.
- Osseointegration is Key: This vital healing period allows the implant to fuse with your jawbone, forming a stable and strong foundation for your new tooth.
- Restoration Completes the Smile: Once osseointegration is complete, an abutment and a custom-made crown are attached, creating a natural-looking and functional tooth.
- Long-Term Care Ensures Success: Proper oral hygiene and regular dental check-ups are essential for the longevity and success of your dental implants.
Understanding the Initial Consultation and Planning Phase
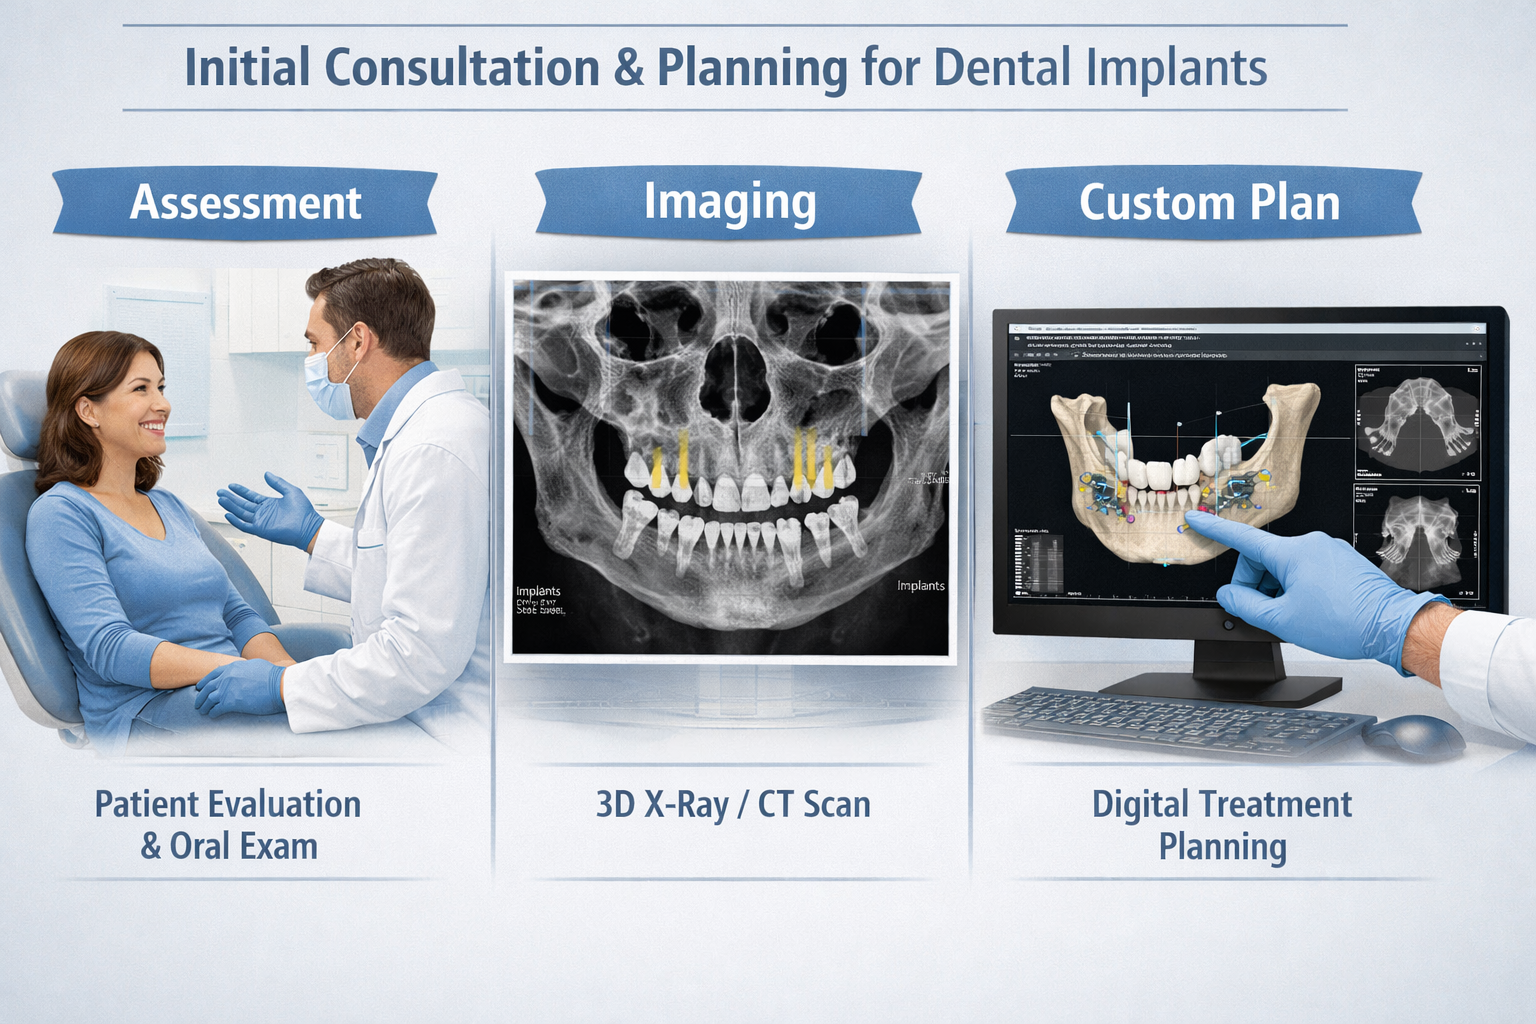
The first step in your dental implant journey is arguably one of the most important: a comprehensive consultation and detailed planning phase. This stage lays the groundwork for the entire procedure, ensuring that dental implants are the right solution for you and that the treatment plan is tailored to your unique needs. If we were to look at dental implants process pictures from this initial phase, we would see a meticulous approach to diagnostics and patient education.
Your First Visit: What to Expect
During your initial consultation, your dental professional, often a periodontist or oral surgeon, will conduct a thorough examination of your mouth. This includes assessing the health of your gums, the condition of your remaining teeth, and most importantly, the density and volume of your jawbone. This is critical because a strong, healthy jawbone is essential to support the implant [1].
Key elements of the initial consultation include:
- Detailed Medical History Review: Your general health, current medications, and any underlying conditions will be discussed to ensure you are a suitable candidate for surgery.
- Oral Examination: A visual inspection of your mouth, gums, and existing teeth.
- Dental X-rays: Traditional X-rays provide a good overview of your oral structures.
- 3D Cone Beam CT Scan (CBCT): This advanced imaging technology provides highly detailed, three-dimensional images of your jawbone, nerves, and sinus cavities. These dental implants process pictures are invaluable for precise planning, allowing the surgeon to visualize the exact location for implant placement, avoiding critical anatomical structures [2]. You can learn more about the importance of a CT scan for dental implants by visiting this page: CT scan and dental implants.
Crafting Your Personalized Treatment Plan
Based on the information gathered, your dental professional will develop a personalized treatment plan. This plan will outline:
- Number and Type of Implants: Whether you need a single implant, multiple implants, or a full arch solution like All-on-4 dental implants.
- Pre-Surgical Procedures: Sometimes, additional procedures are necessary before implant placement. These might include:
- Tooth Extraction: If a damaged tooth needs to be removed.
- Bone Grafting: If you have insufficient jawbone density, a bone graft may be needed to build up the bone. This process allows for proper integration of the implant. Understanding bone graft recovery for dental implants is crucial, and you can find more information here: Bone Graft Recovery Dental Implant.
- Sinus Lift: If implants are needed in the upper jaw and the sinus cavity is too close to the jawbone, a sinus lift can create more space.
- Timeline: An estimated timeframe for the entire process, including healing periods.
- Cost and Financing: A detailed breakdown of costs and available payment options.
“A thorough initial assessment and precise 3D imaging are the cornerstones of a successful dental implant procedure, guiding every subsequent step.”
This phase of dental implants process pictures would show digital models, surgical guides, and detailed discussions, all aimed at achieving the best possible outcome for your smile.
The Dental Implant Placement Surgery
Once your personalized treatment plan is finalized and any necessary pre-surgical procedures have been completed, the next significant step is the dental implant placement surgery itself. This is where the foundation for your new tooth is meticulously laid. When you imagine dental implants process pictures of this stage, think precision, sterility, and careful surgical technique.
What Happens During the Surgery?
The actual implant placement is a minor surgical procedure, typically performed in the dental office under local anesthesia. For patients who experience dental anxiety, options such as oral sedation or intravenous (IV) sedation may also be available to ensure comfort [3].
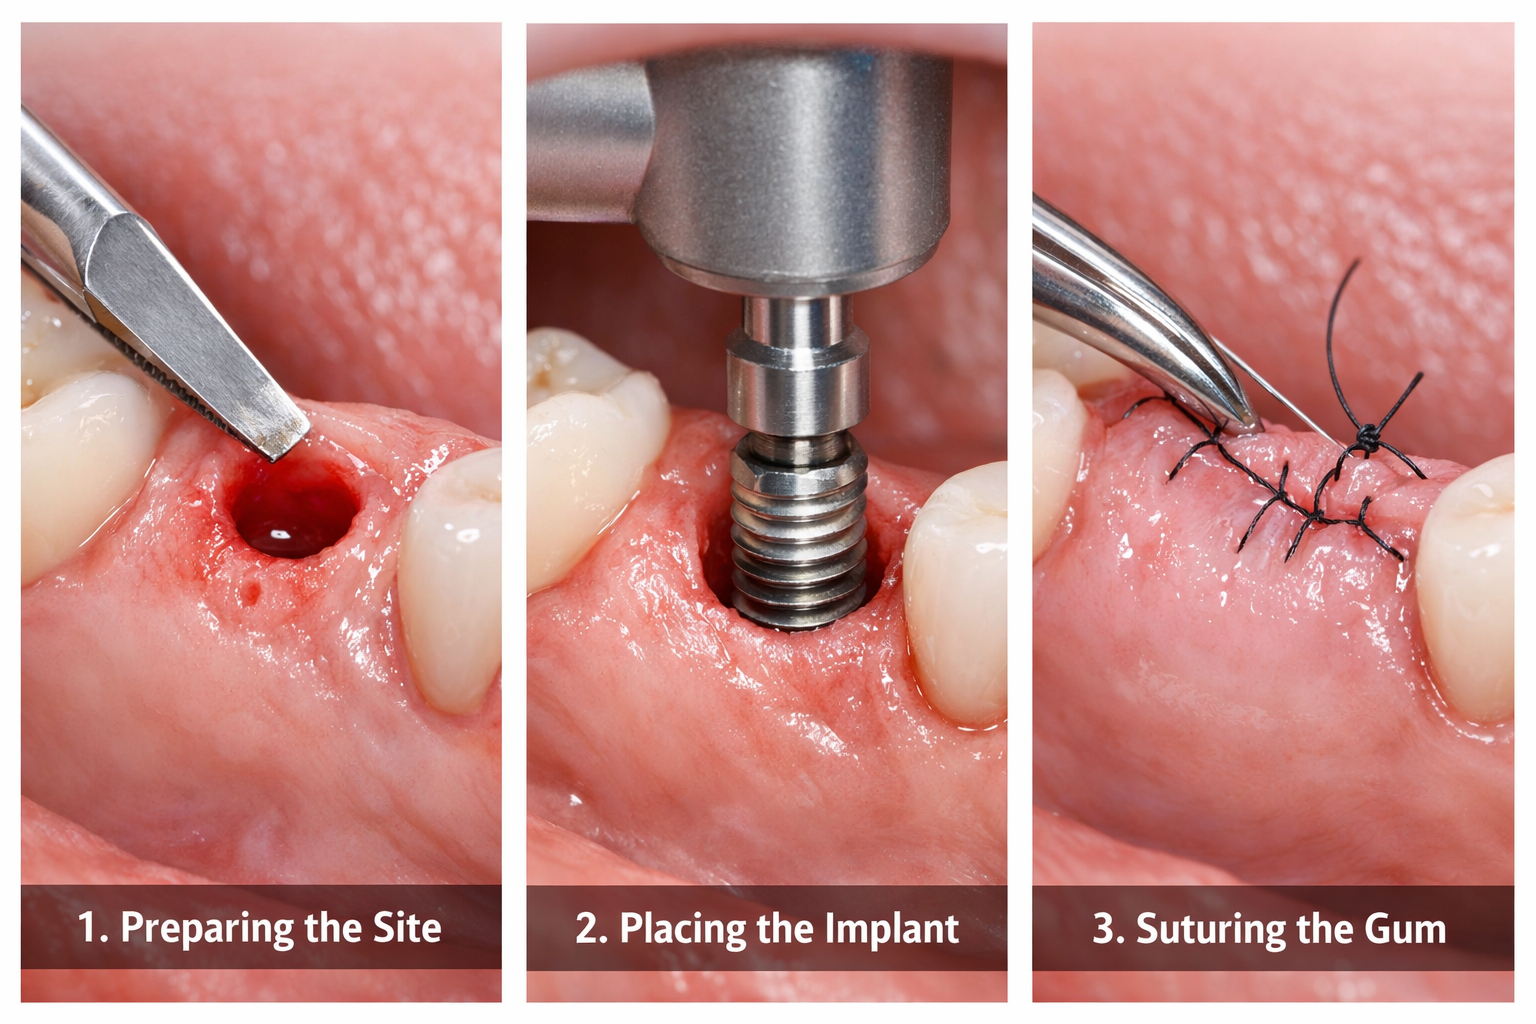
Here’s a breakdown of the typical steps:
- Anesthesia and Numbing: The area will be thoroughly numbed with local anesthesia, ensuring you feel no pain during the procedure. If sedation is used, you will be relaxed or in a twilight sleep.
- Gum Incision: A small incision is made in the gum tissue to expose the underlying jawbone.
- Pilot Hole Preparation: Using specialized drills, a small pilot hole is carefully created in the jawbone at the precise location determined during the planning phase. The surgeon uses extreme care and often a surgical guide (a custom template created from your 3D scans) to ensure accuracy in depth, angle, and position.
- Implant Placement: The titanium dental implant post, which resembles a small screw, is then gently but firmly screwed into the prepared bone. This implant will act as the new “root” for your replacement tooth.
- Gum Closure: Once the implant is securely in place, the gum tissue is carefully sutured closed over the implant. In some cases, a small healing abutment (a tiny cap) might be attached to the implant, protruding through the gum tissue. This allows the gum to heal around it, preparing for the next stage. However, it’s more common for the implant to be completely covered to allow for undisturbed healing.
The entire placement procedure for a single implant usually takes about 1-2 hours. While the idea of surgery can be daunting, patients often report that the discomfort is less than expected, comparable to a tooth extraction. You can learn more about what to expect regarding pain by reading our article: Are dental implants painful?
Immediate Aftercare and Initial Healing
After the surgery, you will receive detailed post-operative instructions. Dental implants process pictures related to this stage might include images of patients applying ice packs to reduce swelling, or visual guides for soft food consumption.
General aftercare tips include:
- Pain Management: Over-the-counter pain relievers or prescribed medication can help manage any discomfort.
- Swelling Reduction: Applying ice packs to the outside of your cheek can minimize swelling.
- Soft Diet: Sticking to soft foods for the first few days or weeks is crucial to avoid disturbing the surgical site. Here’s a helpful resource for 50 soft foods after dental implant.
- Oral Hygiene: Gentle rinsing with salt water or a prescribed antibacterial mouthwash may be recommended. You will need to avoid brushing directly on the surgical site for a short period.
- Avoid Smoking and Alcohol: These can significantly hinder the healing process. Find out more about alcohol after dental implant surgery.
This initial healing period is crucial for the success of the implant, setting the stage for the next vital phase: osseointegration.
The Osseointegration Period: Bone Fuses with Implant
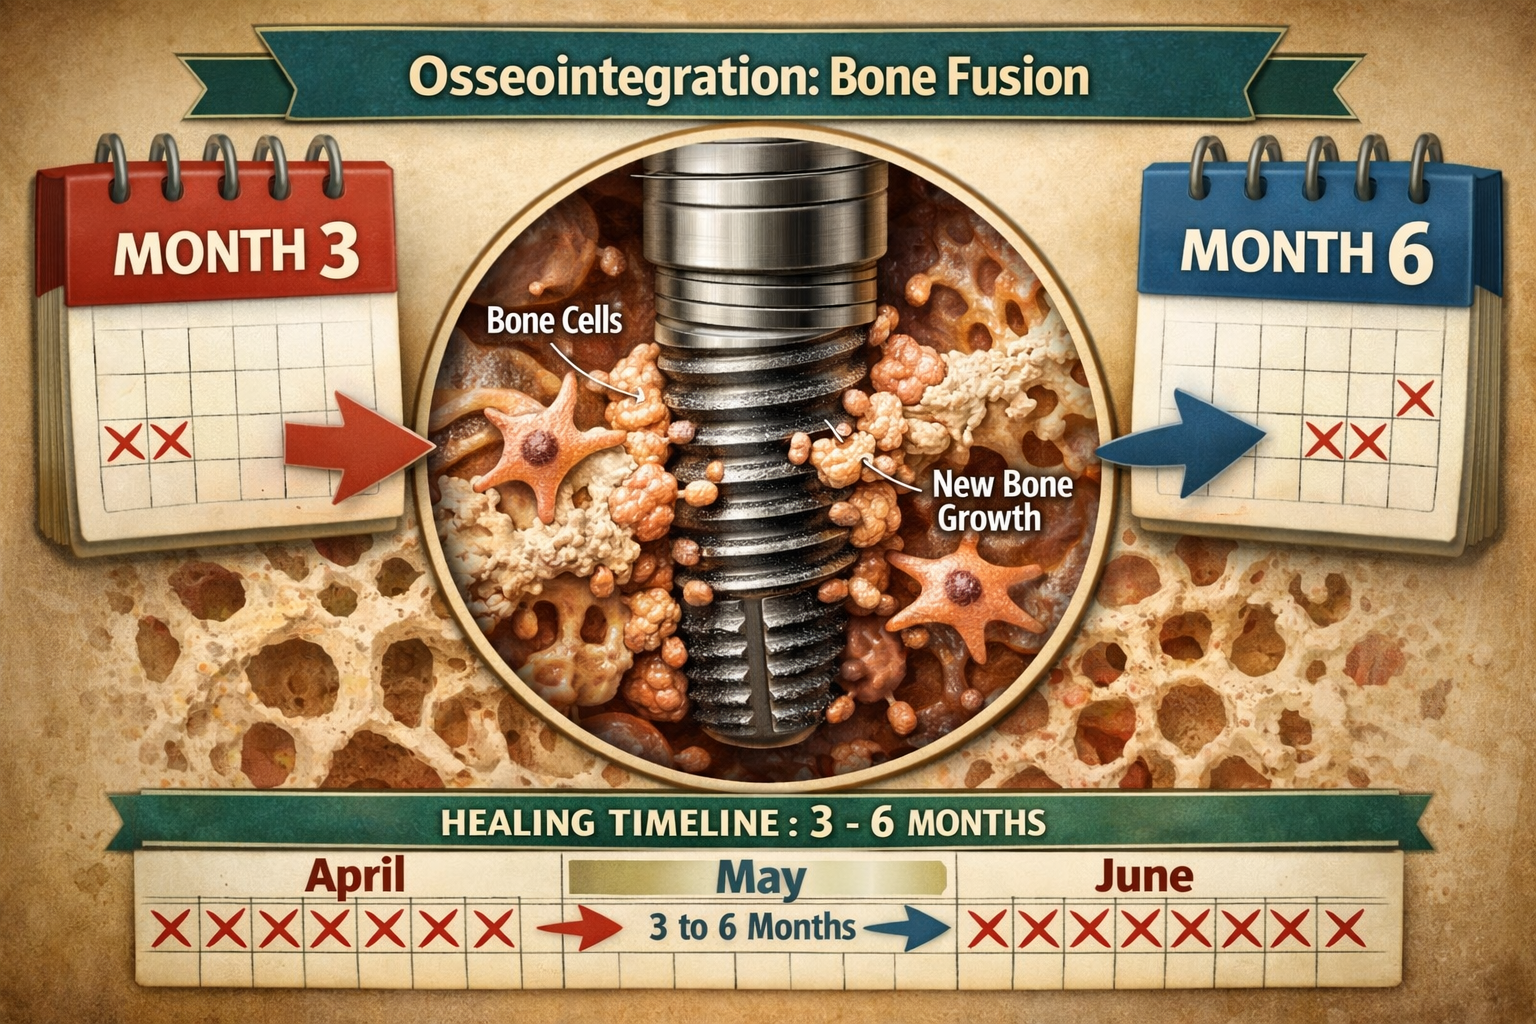
Following the surgical placement of the dental implant, a critical biological process known as osseointegration begins. This is a foundational stage for the long-term success of your dental implant, even though it’s often an “invisible” one to the patient. If we had dental implants process pictures of this stage, they would depict healing at a microscopic level, showing bone cells actively growing and fusing directly onto the titanium surface of the implant.
What is Osseointegration?
Osseointegration literally means “bone integration.” It’s the process by which your jawbone grows around and bonds directly with the surface of the titanium implant. Titanium is biocompatible, meaning your body accepts it readily and allows bone cells to attach to it without rejection. This creates a remarkably strong and stable anchor, much like the root of a natural tooth [4].
Why is osseointegration so important?
- Stability: It ensures the implant is firmly anchored in your jawbone, providing a solid foundation for your new tooth.
- Durability: A fully integrated implant can withstand the forces of chewing and biting for decades.
- Prevents Bone Loss: Dental implants, unlike other tooth replacement options, stimulate the jawbone, helping to prevent the bone loss that often occurs when a tooth is missing.
The Timeline for Healing
The osseointegration period typically takes 3 to 6 months, though this can vary depending on individual healing capabilities, the quality and quantity of bone, and the location of the implant. In some cases, particularly if bone grafting was required, it might take longer.
Factors influencing healing time:
- Bone Density: Denser bone often integrates faster.
- Overall Health: Conditions like diabetes or certain medications can affect healing.
- Oral Hygiene: Maintaining excellent oral hygiene is vital to prevent infection.
- Smoking: Smoking significantly impedes healing and can lead to implant failure [5].
During this time, it’s essential to follow your dentist’s instructions, especially regarding diet and oral hygiene, to avoid disturbing the healing implant. You typically won’t feel anything happening during osseointegration, but your body is working hard behind the scenes!
The Role of a Healing Abutment (Optional)
In some cases, especially if the implant was completely covered by gum tissue during surgery, a minor follow-up procedure may be performed once osseointegration is complete. This involves:
- Exposing the Implant: A small incision is made to uncover the top of the integrated implant.
- Attaching a Healing Abutment: A small metal component called a healing abutment is attached to the implant. This abutment protrudes through the gum tissue, allowing the surrounding gum to heal and form a neat collar around it, just like around a natural tooth. This prepares the site for the final crown. You can learn more about this specific step here: Complete Guide to the Dental Implant Abutment Procedure: What You Need to Know.
This step simplifies the process of attaching the final crown later. While there wouldn’t be dramatic dental implants process pictures of osseointegration itself, images depicting the healing abutment in place would signify the successful completion of this crucial phase, paving the way for the restorative stage.
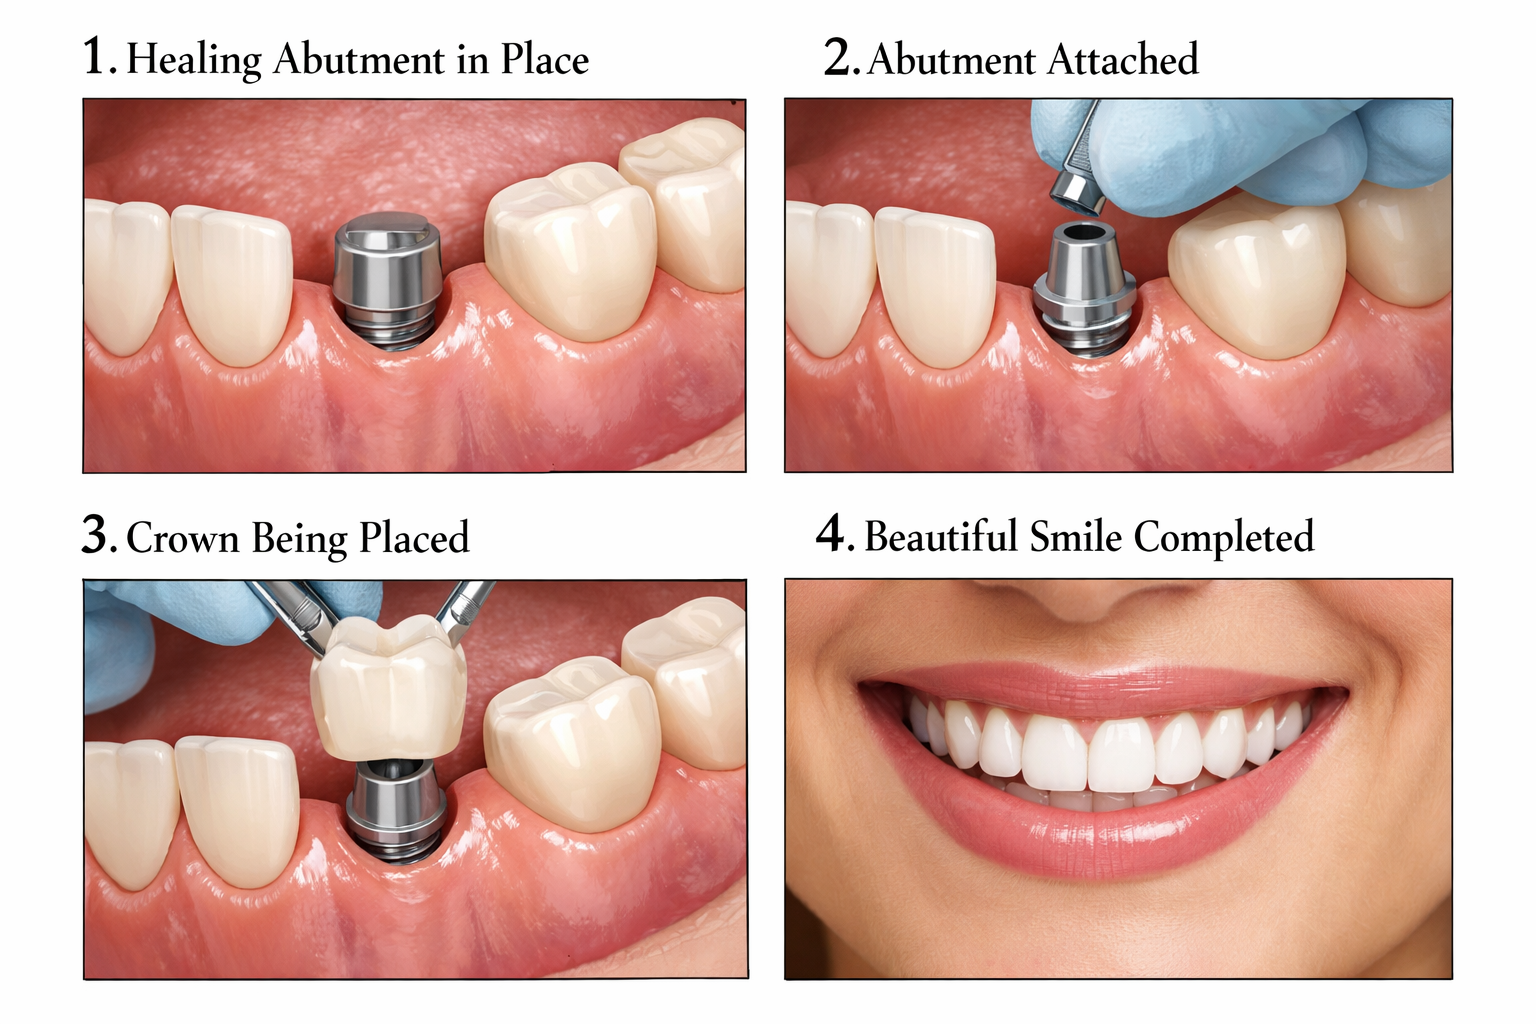
The Restoration Phase: Attaching Your New Tooth
Once the dental implant has fully integrated with your jawbone – a process that ensures a stable and durable foundation – it’s time for the exciting restoration phase. This is where your new, beautiful tooth or teeth are custom-designed and attached, completing the transformation of your smile. When visualizing dental implants process pictures for this stage, think of a meticulous crafting process, culminating in a natural-looking and functional tooth.
Abutment Placement
The first step in the restoration phase is the placement of the abutment. An abutment is a small connector piece that screws into the top of the dental implant. It acts as the anchor for your new crown, bridge, or denture.
The abutment placement process involves:
- Accessing the Implant: If a healing abutment was previously placed, it is removed. If the implant was covered by gum tissue, a minor procedure exposes the top of the integrated implant.
- Attaching the Abutment: The custom-made or stock abutment is securely screwed into the implant. This abutment is designed to protrude slightly above the gum line.
- Gum Healing: Your gums will need a short period, typically 1-2 weeks, to heal around the abutment. This creates a healthy seal and shape around the future crown. More details on healing time can be found on our page about dental implant abutment healing time.
Taking Impressions for Your Custom Restoration
After the gums have healed around the abutment, your dentist will take impressions of your mouth. These impressions serve as a blueprint for the dental lab to create your custom-made restoration.
Types of restorations:
- Crowns: For single tooth replacements. These are meticulously crafted to match the color, shape, and size of your natural teeth. You can read more about them here: Complete Guide to Dental Implant Crowns.
- Bridges: For replacing multiple missing teeth, where two or more implants support a bridge.
- Dentures: For full arch replacement, where multiple implants provide stability for a full denture (e.g., All-on-6 full arch implants).
Traditional impressions involve using a putty-like material, but increasingly, digital impressions using an intraoral scanner are utilized. These digital dental implants process pictures are incredibly accurate and efficient.
Placing the Final Restoration
Once your custom crown, bridge, or denture arrives from the dental lab, you will return for your final appointment.
- Try-in and Adjustments: Your dentist will carefully place the restoration onto the abutment to check for fit, bite, and aesthetics. Any necessary adjustments will be made to ensure it looks and feels perfectly natural.
- Final Attachment: The restoration is then permanently cemented or screwed onto the abutment. For crowns, this usually involves dental cement.
“The final crown, custom-matched to your existing teeth, is the rewarding culmination of the dental implant process, seamlessly restoring function and aesthetics.”
This step is the moment you’ve been waiting for! The final dental implants process pictures from this phase show a complete, natural-looking smile, perfectly blending with your existing teeth. You’ll be able to see the remarkable transformation and appreciate the meticulous work that has gone into restoring your oral health and confidence.
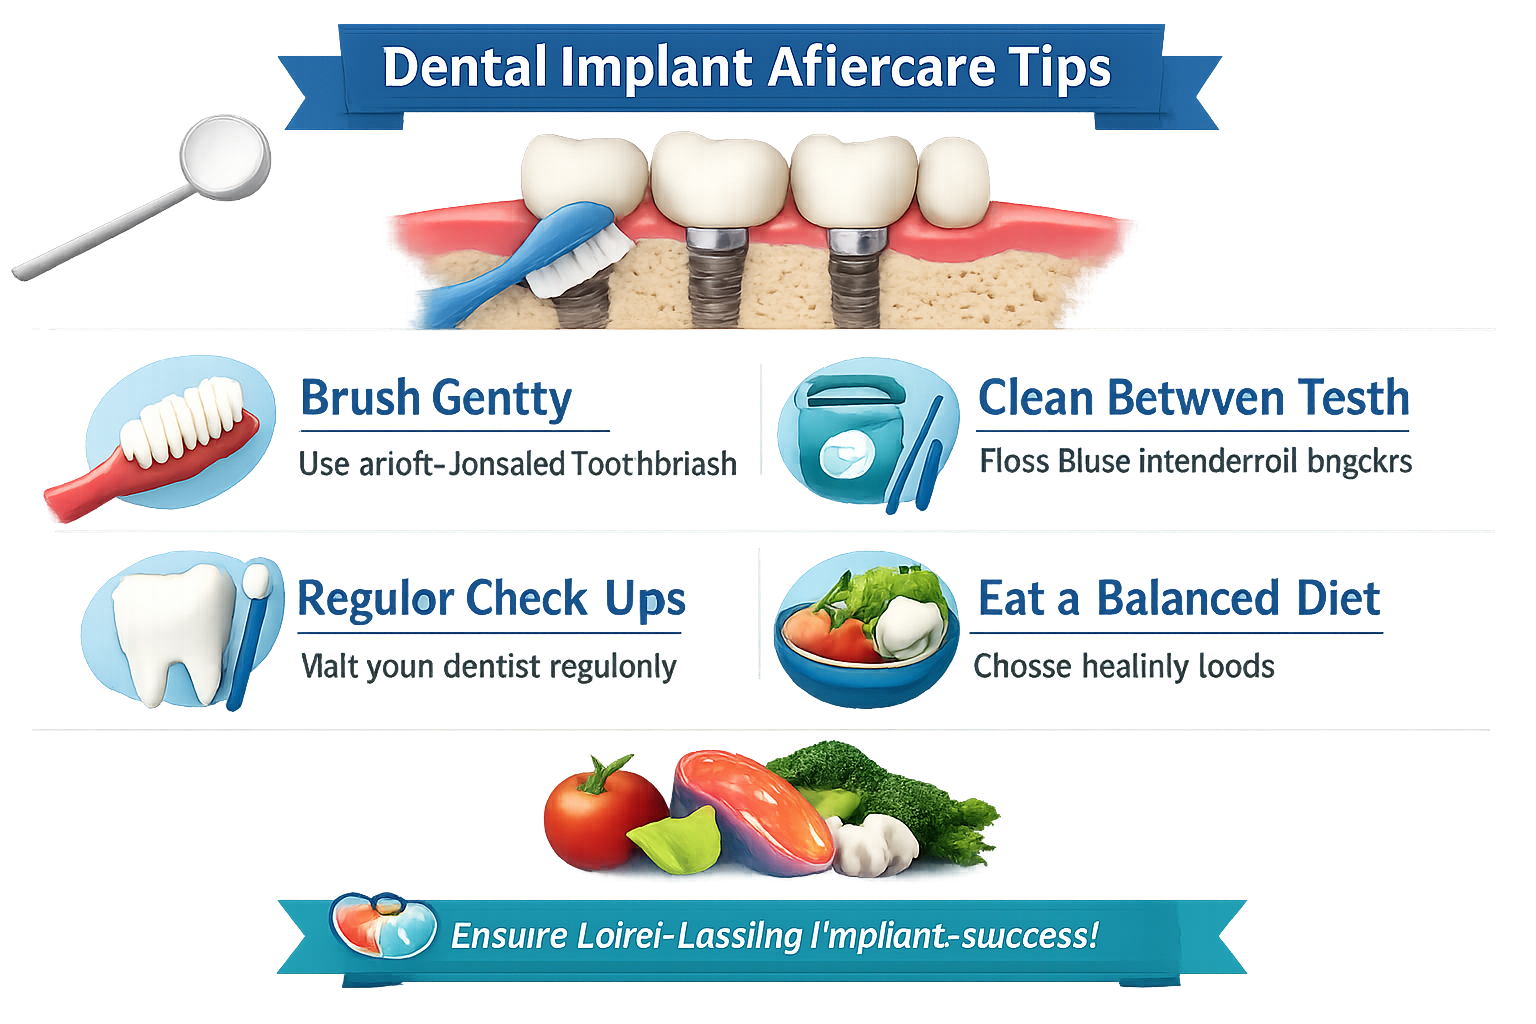
Maintaining Your Dental Implants for Long-Term Success
Congratulations! You’ve successfully navigated the dental implant process and now have a beautiful, functional new tooth or set of teeth. While dental implants are incredibly durable and designed to last many years, their longevity largely depends on proper maintenance and consistent oral hygiene. Just as with natural teeth, good care is essential. When considering dental implants process pictures related to maintenance, think of images depicting healthy gums, shining implants, and diligent oral hygiene routines.
Essential Daily Oral Hygiene
Maintaining excellent oral hygiene is paramount for the long-term success of your dental implants. Although implants themselves cannot get cavities, the surrounding gum tissue can still be susceptible to inflammation and infection (peri-implantitis), which can compromise the implant [6].
Key daily practices include:
- Brushing: Brush your dental implants and remaining natural teeth at least twice a day using a soft-bristled toothbrush. Consider using a non-abrasive toothpaste specifically designed for implants. Check out our recommendations for the best toothpaste for implants.
- Flossing/Interdental Cleaning: Traditional floss might be challenging around implants, so your dentist may recommend special implant-specific floss, interdental brushes, or a water flosser. A water flosser is highly effective at cleaning around implants and under bridges. Learn more about the best water flosser for dental implants.
- Mouthwash: An antimicrobial mouthwash can help reduce bacteria. Your dentist can recommend the best mouthwash for dental implants.
Regular Dental Check-ups and Professional Cleanings
Even with diligent home care, professional dental check-ups are indispensable. Your dentist or dental hygienist has specialized tools and expertise to clean areas you might miss and to monitor the health of your implants and surrounding tissues.
During these appointments, your dental team will:
- Assess Gum Health: Check for any signs of inflammation or infection around the implants.
- Examine the Implant and Restoration: Ensure the crown, bridge, or denture is stable and in good condition.
- Professional Cleaning: Use special instruments designed for cleaning implants to remove plaque and calculus without damaging the implant surface.
- X-rays: Periodically take X-rays to monitor the bone level around the implants.
Lifestyle Choices for Implant Longevity
Certain lifestyle habits can significantly impact the lifespan of your dental implants:
- Avoid Smoking: Smoking is one of the biggest risk factors for implant failure, as it impairs healing and blood flow to the gums and bone.
- Limit Alcohol: Excessive alcohol consumption can also affect oral health and healing.
- Healthy Diet: A balanced diet supports overall health, including your oral health.
- Avoid Hard/Sticky Foods: While implants are strong, biting down on extremely hard items (like ice, hard candies, or nuts in shells) or sticky foods can potentially damage the restoration or even the implant.
- Address Bruxism (Teeth Grinding): If you grind or clench your teeth, your dentist may recommend a nightguard to protect your implants and natural teeth from excessive force.
By committing to these maintenance practices, you are investing in the long-term success and aesthetic appeal of your dental implants. These dental implants process pictures are a testament to the fact that with proper care, your new teeth can truly last a lifetime, providing you with a confident and healthy smile for years to come.
Dental Implant Timeline Estimator 🗓️
*This calculator provides a general estimate for 2026 and is not a substitute for professional dental advice. Individual timelines can vary significantly based on your unique oral health, healing capabilities, and specific treatment plan. Always consult with your dental implant specialist for an accurate assessment.
Conclusion
Embarking on the journey of dental implants is a decision that can profoundly enhance your quality of life, restoring not just your smile but also your ability to eat, speak, and interact with confidence. By exploring the dental implants process pictures in detail, we’ve walked through each critical stage, from the initial meticulous planning and surgical placement to the crucial osseointegration period and the final restoration of your new, beautiful tooth.
We’ve seen how advanced imaging technologies ensure precise implant placement, how the biocompatible titanium fuses with your jawbone to create an incredibly strong foundation, and how custom-crafted crowns complete your smile, making it virtually indistinguishable from natural teeth. Crucially, we’ve also highlighted that the success and longevity of your dental implants depend significantly on your commitment to diligent oral hygiene and regular professional care.
Understanding these steps empowers you to make informed decisions and approach your treatment with confidence. Dental implants are a long-term investment in your oral health and overall well-being, offering a durable, aesthetic, and functional solution to missing teeth.
Actionable Next Steps
If you are considering dental implants, here are your next steps:
- Schedule a Consultation: The most important first step is to consult with a qualified dental implant specialist. They can assess your individual needs and determine if dental implants are the right option for you. Start your journey by seeking a dental implant consultation.
- Ask Questions: Don’t hesitate to ask your dentist about every aspect of the procedure, including the timeline, costs, and expected outcomes. Reviewing dental implants process pictures together can be a great way to visualize your treatment.
- Prioritize Oral Health: Begin or continue to practice excellent oral hygiene to ensure your mouth is as healthy as possible before and after the procedure.
- Explore Financing Options: Discuss payment plans or financing solutions with your dental office to make your treatment more affordable. Many clinics offer flexible options for affordable dental implants in Dallas, TX.
We at Dental Implants Dallas TX are dedicated to providing the highest standard of care and guiding our patients through every step of their dental implant journey. We believe in transparency and education, ensuring you feel comfortable and informed. Your journey to a renewed smile starts here.
References
[1] Misch, C. E. (2000). Contemporary Implant Dentistry. Mosby.
[2] White, S. C., & Pharoah, M. J. (2014). Oral Radiology: Principles and Interpretation. Mosby.
[3] Malamed, S. F. (2014). Handbook of Local Anesthesia. Mosby.
[4] Brånemark, P. I., Zarb, G. A., & Albrektsson, T. (1985). Tissue-Integrated Prostheses: Osseointegration in Clinical Dentistry. Quintessence Publishing Co.
[5] Bain, C. A. (1996). Smoking and implant failure—benefits of a smoking cessation protocol. International Journal of Oral & Maxillofacial Implants, 11(6), 756-759.
[6] Albrektsson, T., & Isidor, F. (1994). Consensus report of session IV. In Proceedings of the 1st European Workshop on Periodontology (pp. 365-368).
Leave a Reply
Share your thoughts or ask a question about dental implants. Your email address will not be published.