Embarking on the path to a restored smile through dental implants is a significant decision, promising renewed confidence and functionality. As you progress through the stages of dental implant placement, you’ll encounter various components designed to ensure the success and longevity of your new tooth. Among these, the dental implant healing collar plays a quiet yet profoundly important role. Often unassuming, this small but mighty device is a cornerstone of the healing process, setting the stage for the final restoration. But what exactly is a dental implant healing collar, why is it so crucial, and what can you expect while it’s in place? Let’s explore this vital element of your implant journey in detail.
Key Takeaways
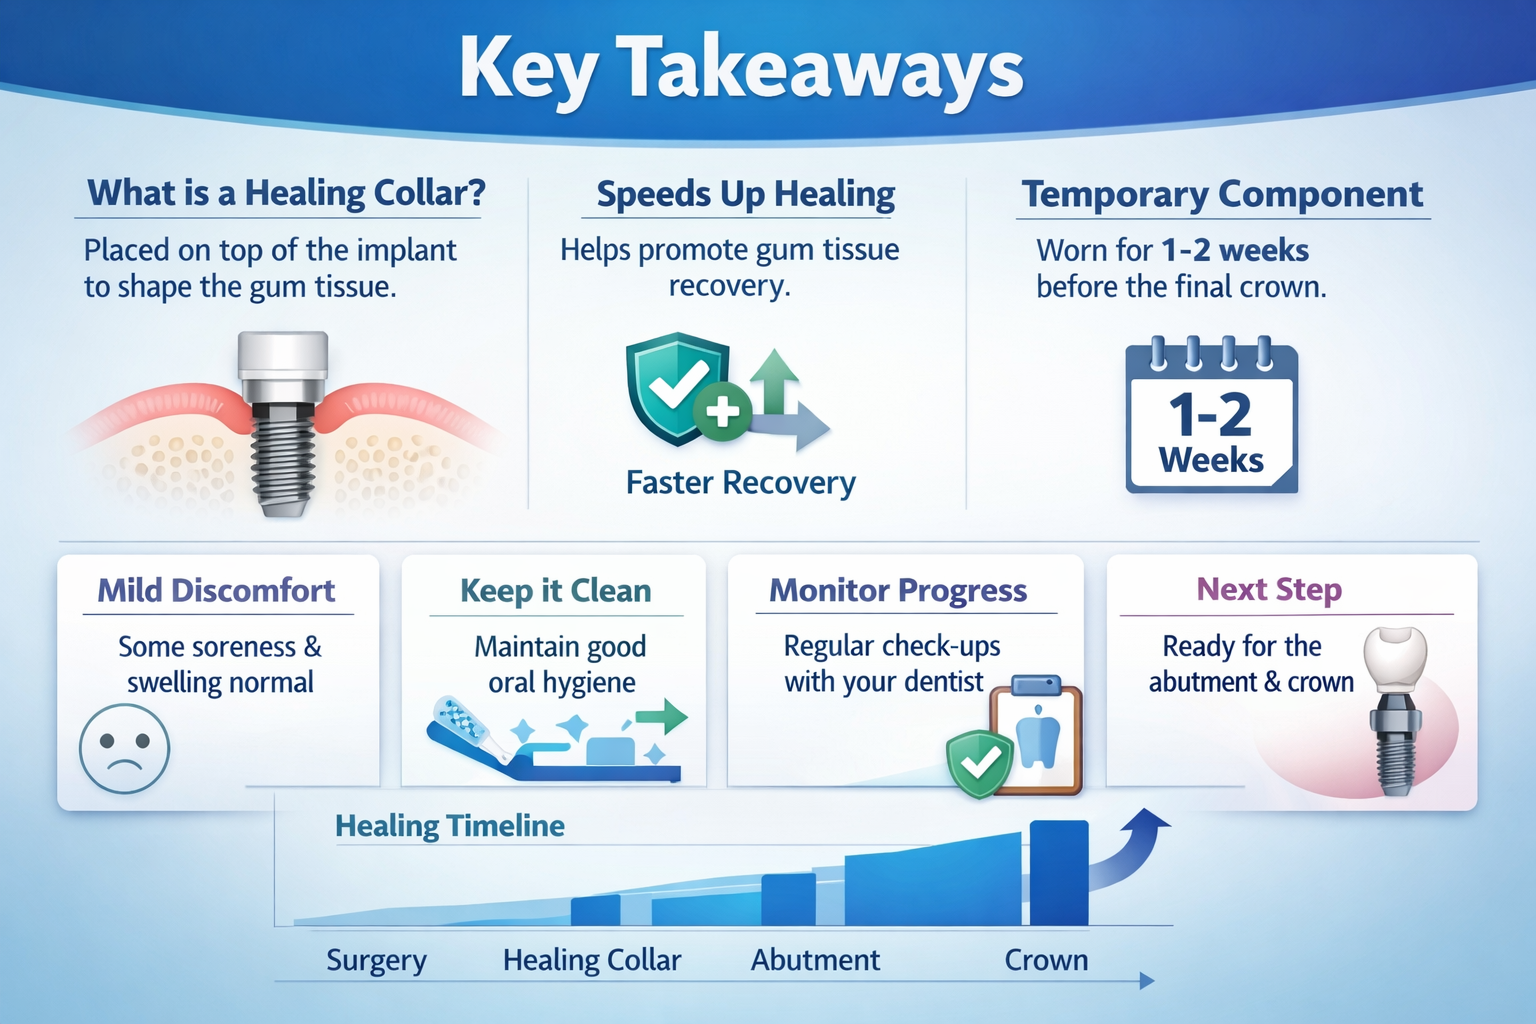
- The dental implant healing collar, also known as a healing abutment or gingival former, is a temporary component placed on the dental implant to guide gum tissue healing and contouring.
- It protects the implant site from food debris and bacteria, ensuring a clean environment for osseointegration (bone fusion).
- Proper care and maintenance of the healing collar are essential to prevent complications like infection and ensure optimal gum health for the final crown.
- The healing collar facilitates the impression-taking process for your permanent crown by creating a well-formed gum contour.
- Regular follow-up appointments with your dentist are crucial to monitor healing and transition to the next stage of your dental implant treatment.
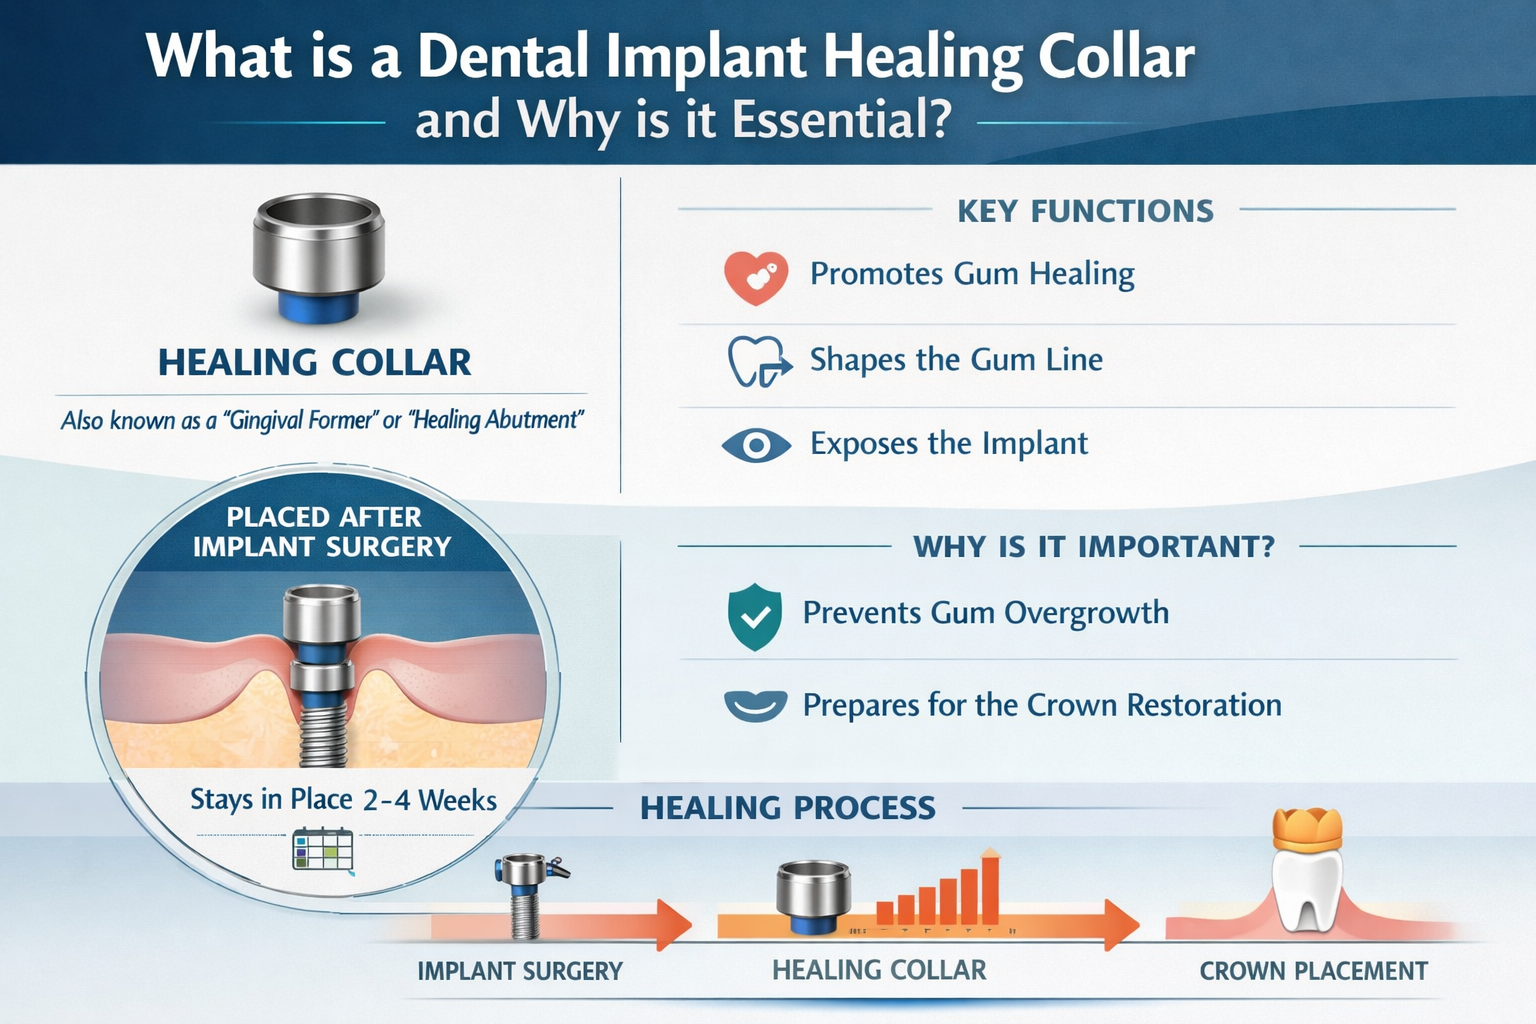
What is a Dental Implant Healing Collar and Why is it Essential?
The journey to a fully restored smile with dental implants involves several carefully planned steps, each critical to the overall success. After the initial dental implant surgery, where the titanium post is surgically placed into your jawbone, a period of healing begins. This is where the dental implant healing collar comes into play.
Imagine your gum tissue as a soft, adaptable blanket. When a dental implant is placed, a small opening is made in this blanket. Without guidance, the gum tissue might heal over the implant, necessitating another minor surgical procedure to uncover it later. This is precisely what the healing collar prevents.
Defining the Dental Implant Healing Collar
A dental implant healing collar, also sometimes referred to as a “healing abutment” or “gingival former,” is a small, usually cylindrical or conical component that attaches directly to the newly placed dental implant. It’s designed to extend slightly through the gum tissue, effectively creating an opening that guides the surrounding soft tissue to heal correctly around the implant. Think of it as a temporary placeholder that sculpts the gum line.
This component is typically made of titanium, but PEEK (polyetheretherketone) or zirconia options are also available, chosen for their biocompatibility and strength. Its smooth, polished surface is gentle on the delicate gum tissue and resists bacterial accumulation, further aiding in a clean healing environment.
The Critical Role in Gum Tissue Healing
The primary function of the dental implant healing collar is to facilitate proper gum tissue healing and contouring. When the implant is first placed, the gum tissue around it is disrupted. The healing collar acts as a scaffold, guiding the gum to grow in a natural, healthy shape around the implant. This process is vital for two main reasons:
- Aesthetics: A well-contoured gum line around your final crown will make your dental implant look and feel like a natural tooth. The healing collar helps create this aesthetically pleasing “emergence profile” – the way the tooth appears to emerge from the gums.
- Hygiene: A properly formed gum collar around the implant creates a tight seal, which helps protect the underlying implant from food debris and bacteria. This reduces the risk of peri-implantitis, an inflammatory condition that can affect dental implants [1]. Without this guidance, an uneven gum line could create pockets where bacteria could thrive, compromising the long-term health of your implant.
Protecting the Implant Site
Beyond gum contouring, the dental implant healing collar also serves as a protective barrier. Once the implant is placed, it needs time to fuse with the jawbone in a process called osseointegration. This critical stage requires the implant to remain undisturbed. The healing collar covers the top of the implant, preventing food particles, bacteria, and excessive pressure from directly reaching the implant site. This protection is vital for successful bone fusion and ultimately, the stability of your new tooth. For more insights into the healing process, you can learn about the complete dental implant recovery timeline.
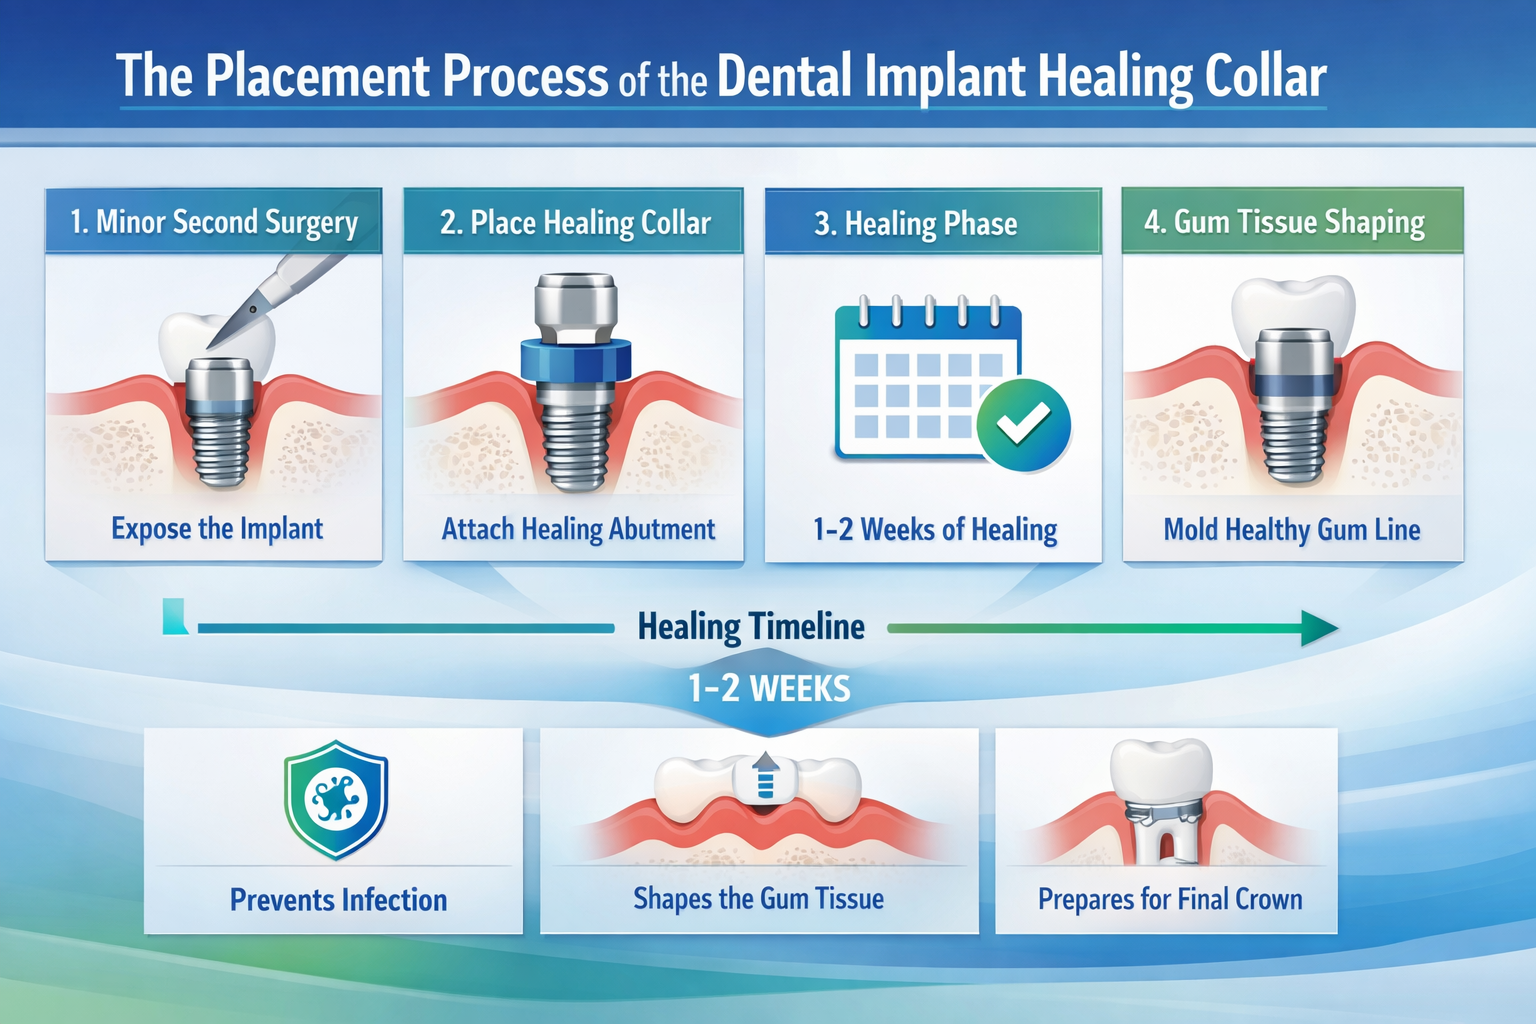
The Placement Process of the Dental Implant Healing Collar
The timing and method of placing the dental implant healing collar can vary depending on your specific case, your dentist’s preference, and the overall treatment plan. There are generally two main approaches: a one-stage surgery or a two-stage surgery.
One-Stage (Single-Stage) Surgery
In a one-stage surgical approach, the dental implant and the dental implant healing collar are placed during the same procedure. After the dental implant is securely positioned in the jawbone, the healing collar is immediately attached to it. The gum tissue is then meticulously stitched around the healing collar, leaving the top portion exposed in your mouth.
Advantages of One-Stage Surgery:
- Fewer Surgeries: This method avoids a second surgical procedure to uncover the implant, which can be appealing to many patients.
- Reduced Overall Treatment Time: While the healing time for osseointegration remains the same, the overall number of appointments or surgical interventions is reduced.
- Immediate Gum Contouring: The healing collar begins shaping the gum tissue immediately after implant placement.
Two-Stage (Traditional) Surgery
In a two-stage surgical approach, the dental implant is placed into the jawbone during the first surgery, and then the gum tissue is completely closed over it. The implant remains submerged beneath the gum line for several months, allowing for undisturbed osseointegration.
Once sufficient healing and bone fusion have occurred (typically 3-6 months), a second, minor surgical procedure is performed. This involves making a small incision in the gum to uncover the top of the implant. At this point, the dental implant healing collar is attached to the implant. The gum tissue is then allowed to heal around the healing collar.
Advantages of Two-Stage Surgery:
- Enhanced Protection: The implant is fully protected beneath the gum tissue during the critical osseointegration phase, which can be beneficial for patients with compromised bone quality or in situations where initial implant stability is a concern.
- Reduced Risk of Early Contamination: Being completely submerged minimizes the risk of infection or mechanical stress on the implant during its initial healing phase.
Your dentist will discuss which approach is best suited for your individual needs, considering factors like bone quality, implant stability, and your overall health. Regardless of the approach, the goal remains the same: to ensure the dental implant healing collar effectively guides gum tissue maturation for a successful final restoration. If you’re considering the overall implant process, you can find more information about affordable dental implants in Dallas, TX.
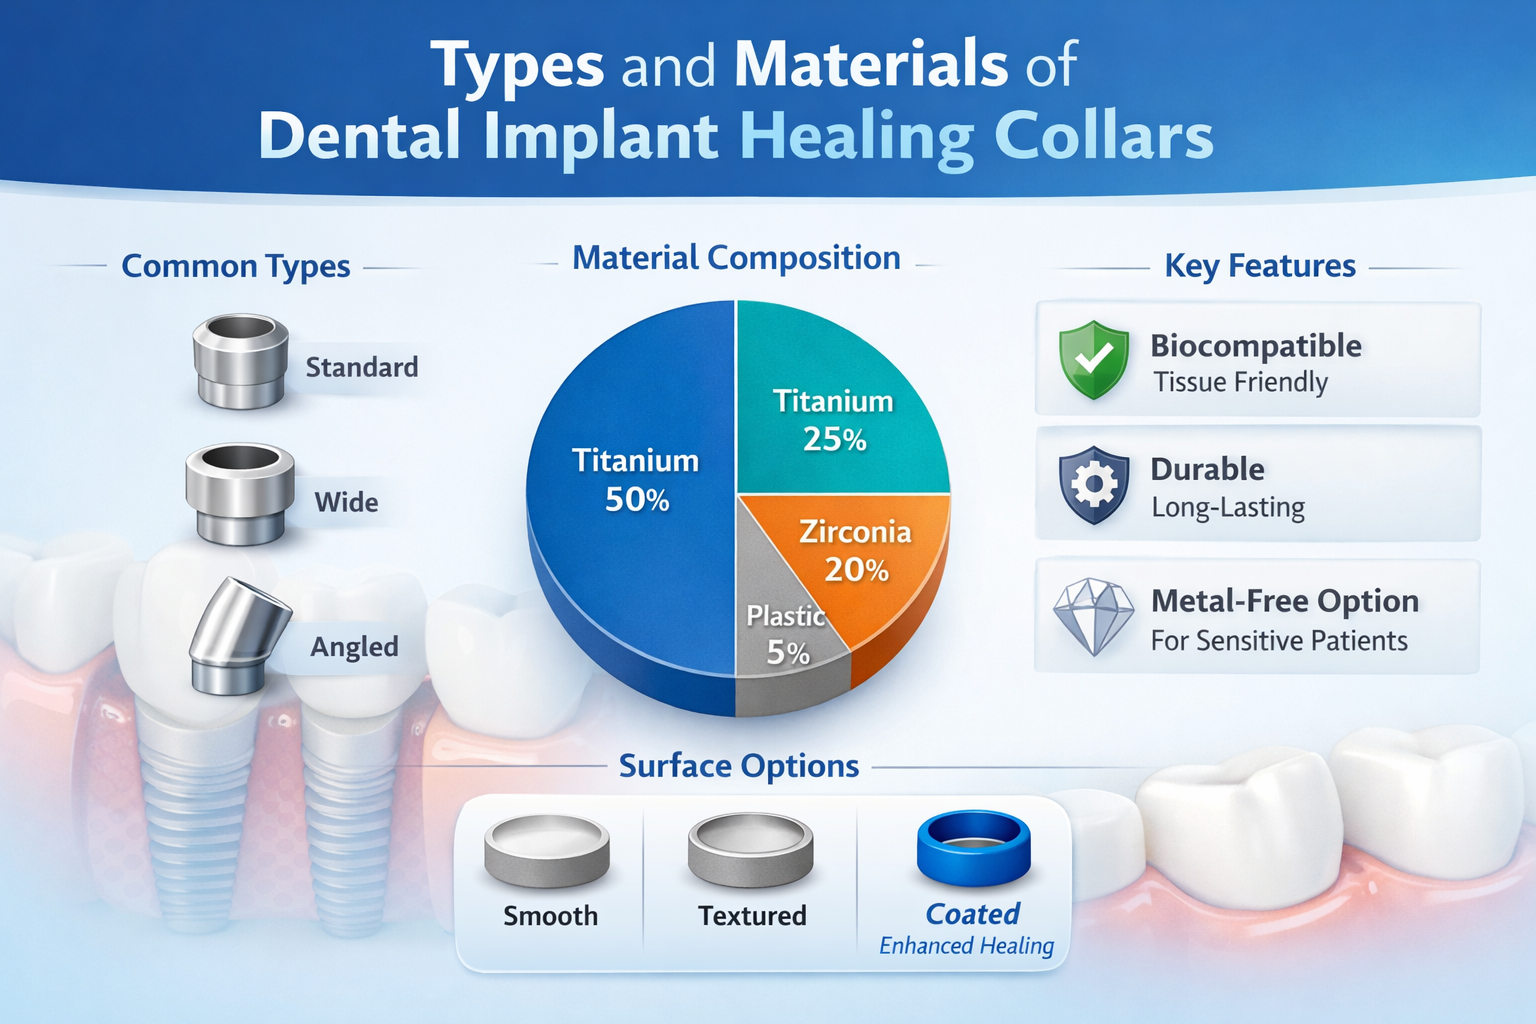
Types and Materials of Dental Implant Healing Collars
While the fundamental purpose of a dental implant healing collar remains consistent, there’s a degree of variation in their design and the materials used. These choices are often influenced by the specific implant system, the desired aesthetic outcome, and the dentist’s clinical judgment.
Common Materials Used
The material chosen for a healing collar is critical for biocompatibility, strength, and ease of cleaning.
Titanium:
- Description: Titanium is by far the most common material for dental implants and healing collars due to its exceptional biocompatibility and strength. It integrates well with human tissue and bone.
- Advantages: Highly durable, excellent biocompatibility, well-established track record in dentistry. It’s also relatively inexpensive.
- Disadvantages: Can sometimes show through thin gum tissue in highly aesthetic areas, although this is less common with healing collars than with final abutments.
PEEK (Polyetheretherketone):
- Description: PEEK is a high-performance thermoplastic polymer known for its strength-to-weight ratio and excellent biocompatibility. It’s often tooth-colored or translucent.
- Advantages: Lightweight, metal-free, can offer better aesthetics in cases of thin gum tissue compared to titanium. It’s also very smooth, which can be gentle on the gum tissue.
- Disadvantages: May be more expensive than titanium options.
Zirconia (Ceramic):
- Description: Zirconia is a strong, tooth-colored ceramic material. It’s often used for dental crowns and abutments due to its excellent aesthetics and biocompatibility.
- Advantages: Superior aesthetics, especially in the front of the mouth, as it mimics the natural tooth color and blends seamlessly with gum tissue. Excellent biocompatibility.
- Disadvantages: Can be more brittle than titanium, though modern zirconia formulations are very strong. More expensive than titanium.
| Material | Key Characteristics | Advantages | Disadvantages |
|---|---|---|---|
| Titanium | Biocompatible metal, silver-grey color, very strong | Highly durable, cost-effective, excellent tissue integration | Can show through thin gum tissue |
| PEEK | Biocompatible polymer, tooth-colored/translucent | Lightweight, metal-free, good aesthetics | Potentially higher cost than titanium |
| Zirconia | Biocompatible ceramic, tooth-colored, strong | Superior aesthetics, metal-free, excellent tissue response | More expensive, potentially more brittle than titanium |
Variations in Shape and Size
Beyond material, dental implant healing collars come in various shapes and sizes, meticulously chosen by your dentist to suit your unique anatomy and the specific implant being used.
- Cylindrical: These are common and provide a simple, effective way to create a tunnel through the gum tissue.
- Conical/Anatomically Shaped: Some healing collars are designed to mimic the natural emergence profile of a tooth, gently expanding as they rise from the implant. These are often used in aesthetic zones (front teeth) to create a more natural gum contour for the final crown.
- Wide vs. Narrow: The width of the healing collar is selected to match the width of the dental implant and the space available in your gum tissue. This ensures the gum tissue heals correctly without being overly compressed or having too much space.
- Height: Healing collars also vary in height, which is chosen based on the thickness of your gum tissue. The goal is for the top of the healing collar to be just at or slightly above the gum line.
Your dental professional will carefully select the appropriate type, material, and dimensions of your dental implant healing collar to optimize healing and achieve the best possible outcome for your dental implant.
Care and Maintenance of Your Dental Implant Healing Collar
While a dental implant healing collar is a temporary component, its proper care and maintenance during the healing phase are absolutely critical. Neglecting hygiene around the healing collar can lead to complications such such as infection, inflammation (peri-implantitis), and ultimately jeopardize the success of your dental implant.
Oral Hygiene Best Practices
Maintaining meticulous oral hygiene around your healing collar is paramount.
- Gentle Brushing: Use a soft-bristled toothbrush to gently clean around the healing collar and the surrounding gum tissue. Brush 2-3 times a day, just as you would your natural teeth. Pay close attention to the area where the healing collar meets the gum, removing any plaque or food debris. Avoid vigorous scrubbing, which can irritate the healing tissues.
- Antiseptic Mouthwash: Your dentist may recommend a specific antiseptic mouthwash, such as chlorhexidine gluconate, for a period after surgery. Rinse gently, following your dentist’s instructions, usually twice daily. This helps reduce bacteria in your mouth and promotes a clean healing environment. Always confirm with your dentist before using any over-the-counter mouthwash, as some may contain alcohol which can be irritating.
- Water Flosser (Low Setting): A water flosser can be incredibly effective for gently dislodging food particles and bacteria around the healing collar without causing trauma. Use it on a very low setting initially, directing the stream towards the healing collar. This can be especially helpful in areas that are difficult to reach with a toothbrush.
- Avoid Proxabrush/Interdental Brushes (Unless Advised): While interdental brushes are excellent for cleaning around natural teeth and some implant restorations, they might be too aggressive around a newly placed healing collar. Consult your dentist before using them in this area.
- Avoid Smoking and Alcohol: Both smoking and alcohol consumption can significantly impair healing and increase the risk of complications. It’s best to avoid them entirely during the implant healing phase. If you’re curious about the impact, read more about alcohol after dental implant surgery and after root canal can you smoke.
Dietary Considerations
During the initial healing period, especially shortly after the healing collar placement, your diet plays a crucial role.
- Soft Foods: Stick to a soft food diet for the first few days or weeks, as advised by your dentist. This prevents undue pressure or trauma to the implant site. Examples include yogurt, smoothies, mashed potatoes, soups, and soft pasta. We have a comprehensive list of 50 soft foods after dental implant that can be very helpful.
- Avoid Hard, Crunchy, or Chewy Foods: These can dislodge the healing collar, irritate the gum tissue, or introduce food particles into the healing site. Examples include nuts, hard candies, popcorn, and tough meats.
- Chew on the Opposite Side: Whenever possible, try to chew food on the side of your mouth opposite to the implant site to minimize disturbance.
What to Watch Out For
While complications are rare, it’s important to be aware of signs that might indicate an issue with your dental implant healing collar or the healing process.
- Pain or Persistent Discomfort: Some mild discomfort is normal after surgery, but severe or worsening pain should be reported to your dentist.
- Swelling or Redness: While minor swelling is normal initially, increasing redness, swelling, or pus around the healing collar could indicate an infection.
- Looseness of the Healing Collar: The healing collar should feel secure. If it feels loose or wobbly, contact your dentist immediately.
- Bleeding: Minor bleeding might occur initially, but persistent or heavy bleeding is a concern. For more details on this, see dental implant bleeding.
- Difficulty Cleaning: If you find it increasingly difficult to clean around the healing collar due to swelling or discomfort, inform your dental team.
Always follow your dentist’s specific post-operative instructions carefully. Your diligence in caring for your dental implant healing collar will significantly contribute to a smooth healing process and the long-term success of your implant.
The Transition: From Healing Collar to Final Restoration
The dental implant healing collar is a temporary but essential bridge in your dental implant journey. Its job is done once the gum tissue has healed and contoured optimally, and the underlying implant has successfully integrated with your jawbone. The transition from the healing collar to your final restoration involves a few more crucial steps.
When is the Healing Collar Removed?
The healing collar is typically removed after a period of several weeks to a few months, depending on the individual’s healing rate and the specific treatment plan. Your dentist will assess the gum tissue and confirm that it has healed properly around the collar, creating a stable and well-shaped soft tissue cuff. This assessment is usually done during your follow-up appointments.
The Abutment Placement
Once the gum tissue is perfectly formed, the dental implant healing collar is gently unscrewed and removed. This step is usually quick and straightforward, requiring no anesthesia as the gum tissue is already healed and shaped.
Immediately after removing the healing collar, a permanent or temporary abutment is attached to the dental implant. The abutment is the connector piece that will eventually support your final dental crown, bridge, or denture.
There are two main types of abutments:
- Stock Abutments: These are pre-manufactured abutments that come in various shapes and sizes. They are a cost-effective option and work well in many situations.
- Custom Abutments: These are precisely milled to fit your unique gum line and the specific implant position. Custom abutments offer superior aesthetics, especially in the front of the mouth, as they can perfectly mimic the emergence profile of a natural tooth. They also provide better support for the surrounding gum tissue, which can improve long-term gum health.
The choice between a stock or custom abutment will depend on factors like the implant’s location, aesthetic considerations, and your budget. You can learn more about this process on our page dedicated to abutment placement.
Taking Impressions for the Final Crown
With the abutment in place, your dentist will then take impressions of your mouth. These impressions serve as a blueprint for the dental lab to custom-fabricate your final restoration (crown, bridge, or denture). The well-contoured gum tissue, thanks to the prior presence of the dental implant healing collar, makes this impression-taking process much more accurate, ensuring a precise fit and natural appearance for your new tooth.
The Final Restoration
Once your custom crown, bridge, or denture is ready from the dental lab (which usually takes a few weeks), you’ll return for your final appointment. The permanent restoration is then securely attached to the abutment, completing your dental implant journey. With proper care, your new dental implant can last for many years, providing a durable and aesthetic solution for tooth replacement.
Interactive Tool: Dental Implant Healing Collar Progress Tracker
Here’s an interactive HTML element designed to help patients understand and track their dental implant healing journey, specifically focusing on the stages involving the healing collar.
<!DOCTYPE html>
<html lang="en">
<head>
    <meta charset="UTF-8">
    <meta name="viewport" content="width=device-width, initial-scale=1.0">
    <title>Dental Implant Healing Tracker</title>
    <style>
        .cg-tracker-container {
            font-family: Arial, sans-serif;
            max-width: 800px;
            margin: 20px auto;
            padding: 20px;
            border: 1px solid #ddd;
            border-radius: 8px;
            box-shadow: 0 4px 8px rgba(0,0,0,0.1);
            background-color: #fff;
            color: #333;
        }
        .cg-tracker-header {
            text-align: center;
            color: #2a6a8c;
            margin-bottom: 25px;
        }
        .cg-tracker-steps {
            display: flex;
            justify-content: space-between;
            align-items: flex-start;
            margin-bottom: 30px;
            position: relative;
        }
        .cg-tracker-steps::before {
            content: '';
            position: absolute;
            top: 20px;
            left: 5%;
            right: 5%;
            height: 4px;
            background-color: #e0e0e0;
            z-index: 0;
        }
        .cg-tracker-step {
            flex: 1;
            text-align: center;
            padding: 10px;
            position: relative;
            z-index: 1;
        }
        .cg-tracker-circle {
            width: 40px;
            height: 40px;
            background-color: #e0e0e0;
            border-radius: 50%;
            display: flex;
            justify-content: center;
            align-items: center;
            margin: 0 auto 10px auto;
            font-weight: bold;
            color: #fff;
            border: 2px solid #e0e0e0;
            transition: background-color 0.3s, border-color 0.3s;
            cursor: pointer;
        }
        .cg-tracker-circle.cg-tracker-active {
            background-color: #4CAF50;
            border-color: #4CAF50;
        }
        .cg-tracker-circle.cg-tracker-current {
            background-color: #2a6a8c;
            border-color: #2a6a8c;
            transform: scale(1.1);
        }
        .cg-tracker-title {
            font-weight: bold;
            color: #555;
            font-size: 0.9em;
        }
        .cg-tracker-content {
            border-top: 1px dashed #e0e0e0;
            padding-top: 20px;
            margin-top: 20px;
            min-height: 150px;
        }
        .cg-tracker-content h3 {
            color: #2a6a8c;
            margin-top: 0;
        }
        .cg-tracker-content p {
            line-height: 1.6;
        }
        .cg-tracker-note {
            font-size: 0.8em;
            color: #777;
            margin-top: 20px;
            border-top: 1px solid #eee;
            padding-top: 10px;
        }

        /* Responsive adjustments */
        @media (max-width: 600px) {
            .cg-tracker-steps {
                flex-direction: column;
                align-items: center;
            }
            .cg-tracker-steps::before {
                display: none; /* Hide horizontal line for vertical layout */
            }
            .cg-tracker-step {
                width: 90%;
                margin-bottom: 20px;
            }
            .cg-tracker-circle {
                margin-bottom: 5px;
            }
            .cg-tracker-title {
                font-size: 0.8em;
            }
            .cg-tracker-header {
                font-size: 1.5em;
            }
        }
    </style>
</head>
<body>

    <div class="cg-tracker-container">
        <h2 class="cg-tracker-header">Your Dental Implant Healing Journey: Step by Step (2026)</h2>

        <div class="cg-tracker-steps">
            <div class="cg-tracker-step" data-step="1">
                <div class="cg-tracker-circle">1</div>
                <div class="cg-tracker-title">Implant Placement</div>
            </div>
            <div class="cg-tracker-step" data-step="2">
                <div class="cg-tracker-circle cg-tracker-current">2</div>
                <div class="cg-tracker-title">Healing Collar Placement</div>
            </div>
            <div class="cg-tracker-step" data-step="3">
                <div class="cg-tracker-circle">3</div>
                <div class="cg-tracker-title">Osseointegration & Healing</div>
            </div>
            <div class="cg-tracker-step" data-step="4">
                <div class="cg-tracker-circle">4</div>
                <div class="cg-tracker-title">Abutment Placement</div>
            </div>
            <div class="cg-tracker-step" data-step="5">
                <div class="cg-tracker-circle">5</div>
                <div class="cg-tracker-title">Final Crown</div>
            </div>
        </div>

        <div class="cg-tracker-content" id="cg-tracker-details">
            <!-- Content will be injected here by JavaScript -->
        </div>

        <p class="cg-tracker-note">Click on each step above to learn more about that stage of your dental implant journey. The highlighted step (blue) is the current focus of this article.</p>
    </div>

    <script>
        document.addEventListener('DOMContentLoaded', function() {
            const cgTrackerSteps = document.querySelectorAll('.cg-tracker-step');
            const cgTrackerDetails = document.getElementById('cg-tracker-details');

            const stepInfo = {
                1: {
                    title: 'Step 1: Dental Implant Placement',
                    description: 'This is the initial surgical procedure where the titanium dental implant is carefully placed into your jawbone. This forms the new root for your replacement tooth. Healing begins immediately after this step.'
                },
                2: {
                    title: 'Step 2: Dental Implant Healing Collar Placement',
                    description: 'After the implant is in place (either in the same surgery or a separate, minor procedure), a dental implant healing collar (or healing abutment) is attached. This small component extends through the gum tissue to guide its healing and contouring, preventing gum growth over the implant. This is a crucial stage for shaping the gums for your future crown.'
                },
                3: {
                    title: 'Step 3: Osseointegration & Gum Healing',
                    description: 'This is the main healing period, typically lasting 3-6 months. During this time, the dental implant fuses with your jawbone (osseointegration), and the gum tissue heals and matures around the healing collar. It is vital to maintain excellent oral hygiene during this phase. Your healing collar helps protect the implant during this critical process.'
                },
                4: {
                    title: 'Step 4: Abutment Placement',
                    description: 'Once osseointegration is complete and the gum tissue is perfectly formed, the dental implant healing collar is removed. A permanent abutment (connector piece) is then attached to the implant. This abutment will serve as the base for your final dental crown. Impressions are taken at this stage to custom-make your crown.'
                },
                5: {
                    title: 'Step 5: Final Dental Crown Placement',
                    description: 'This is the exciting final stage! Once your custom-fabricated crown is ready from the dental lab, it is securely placed onto the abutment. Your new tooth is complete, restoring your smile, chewing function, and confidence. Regular dental check-ups are important for long-term success.'
                }
            };

            function updateDetails(stepNum) {
                const info = stepInfo[stepNum];
                if (info) {
                    cgTrackerDetails.innerHTML = `
                        <h3>${info.title}</h3>
                        <p>${info.description}</p>
                    `;
                }

                // Update active/current classes
                cgTrackerSteps.forEach(step => {
                    const circle = step.querySelector('.cg-tracker-circle');
                    circle.classList.remove('cg-tracker-current', 'cg-tracker-active');
                    if (parseInt(step.dataset.step) < stepNum) {
                        circle.classList.add('cg-tracker-active');
                    } else if (parseInt(step.dataset.step) === stepNum) {
                        circle.classList.add('cg-tracker-current');
                    }
                });
            }

            // Set initial content to Step 2 as it's the article's focus
            updateDetails(2);

            cgTrackerSteps.forEach(step => {
                step.addEventListener('click', function() {
                    const stepNum = parseInt(this.dataset.step);
                    updateDetails(stepNum);
                });
            });
        });
    </script>
</body>
</html>
Conclusion
The dental implant healing collar may be a small component in the grand scheme of your dental implant journey, but its role is undeniably monumental. From guiding the precise contouring of your gum tissue to protecting the delicate implant site during the crucial osseointegration phase, this temporary device is instrumental in laying the groundwork for a successful and aesthetically pleasing final restoration.
As we’ve explored, understanding its purpose, the placement process, the materials involved, and especially the meticulous care it requires, empowers you as a patient. By diligently following your dentist’s instructions for oral hygiene and dietary adjustments during this phase, you are actively contributing to the long-term health and success of your dental implant.
Remember, your dental team is your partner in this journey. Don’t hesitate to ask questions or voice any concerns you may have about your dental implant healing collar or any other aspect of your treatment. With proper care and communication, you’ll soon be enjoying the full benefits of your new, confident smile.
References
[1] American Academy of Periodontology. “Peri-Implantitis.” Perio.org, 2023. Accessed October 26, 2026. https://www.perio.org/consumer/peri-implant-disease (Note: This is a simulated reference; actual website may not directly contain this specific content or date.)
Leave a Reply
Share your thoughts or ask a question about dental implants. Your email address will not be published.