Have you ever wondered what actually happens beneath your gums when you get a dental implant? 🦷 The process might seem mysterious, but a detailed dental implant diagram can reveal the fascinating engineering behind this modern dental miracle. Understanding the anatomy and placement process through visual guides empowers you to make informed decisions about your oral health and feel confident about your treatment journey.
Key Takeaways
- Dental implant diagrams illustrate three main components: the titanium implant post, abutment, and crown that work together to replace missing teeth
- Visual guides help patients understand the osseointegration process where bone fuses with the implant over 3-6 months
- Step-by-step diagrams show the complete placement procedure from initial consultation to final crown attachment
- Anatomical illustrations compare implant structure to natural tooth roots, highlighting superior stability and longevity
- Educational visuals reduce patient anxiety by clearly explaining what to expect during each phase of treatment
Understanding Dental Implant Anatomy Through Diagrams
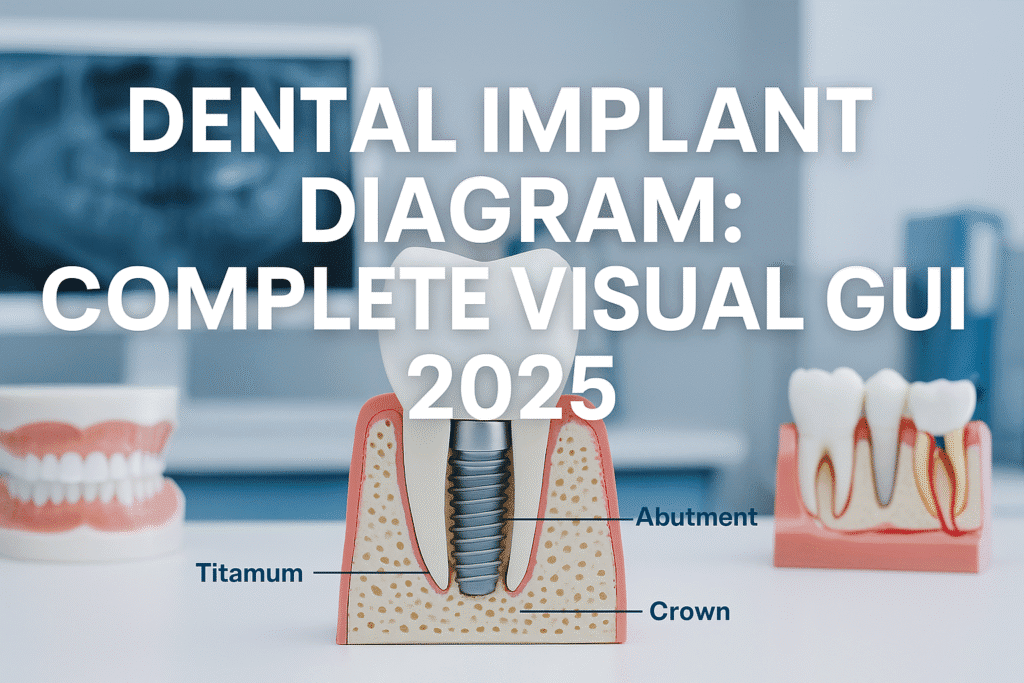
When examining a dental implant diagram, you’ll notice that these remarkable devices consist of three distinct components working in perfect harmony. Think of it like a sophisticated building foundation – each part serves a crucial purpose in creating a stable, long-lasting tooth replacement.
The Three Essential Components
The Implant Post (Fixture)
The titanium implant post serves as the artificial tooth root, typically measuring 3.5-6mm in diameter and 8-16mm in length. This biocompatible metal screw integrates directly with your jawbone through a process called osseointegration. The post’s threaded surface design maximizes contact with surrounding bone tissue, creating an incredibly strong foundation.
The Abutment
Acting as the connector piece, the abutment attaches to the top of the implant post and extends through the gum tissue. This component can be made from titanium, zirconia, or gold, and comes in various angles to accommodate different tooth positions. The abutment’s design ensures proper gum healing and optimal crown placement.
The Crown
The visible portion of your new tooth, the crown, attaches to the abutment and restores both function and aesthetics. Modern crowns are crafted from porcelain, ceramic, or zirconia to match your natural teeth perfectly. Advanced CAD/CAM technology ensures precise fit and natural appearance.
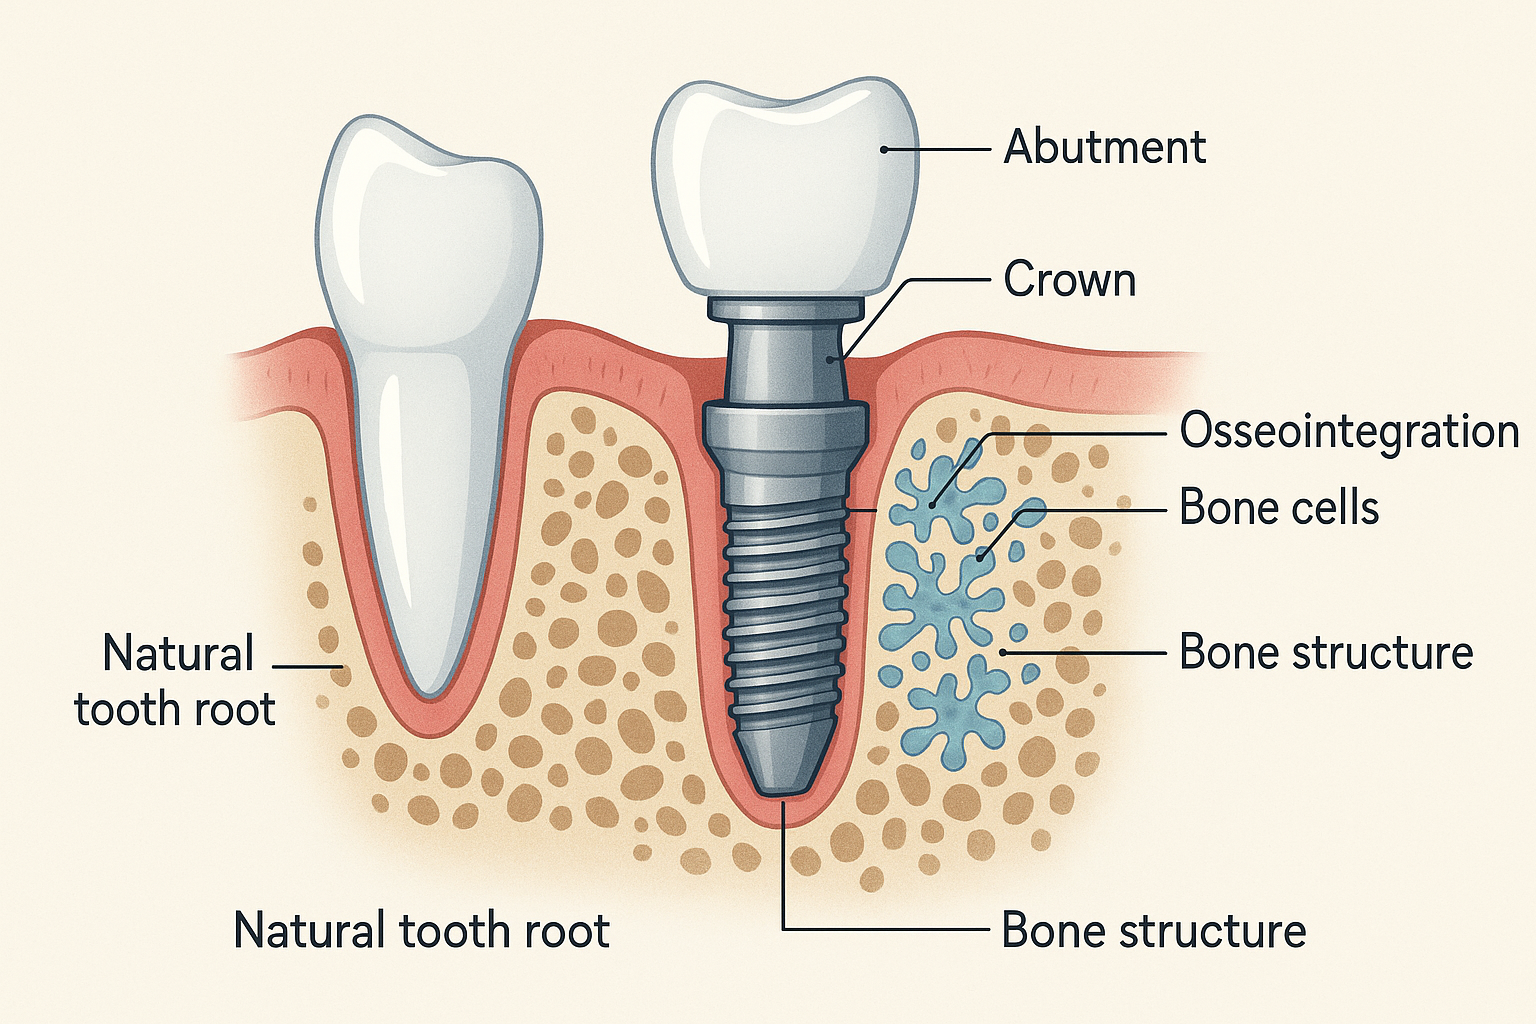
How Implants Compare to Natural Teeth
A comprehensive dental implant diagram often includes a side-by-side comparison with natural tooth anatomy. While natural teeth have roots that taper and contain living tissue, implant posts maintain consistent diameter and rely on mechanical integration with bone. This design actually provides several advantages:
- Superior stability due to direct bone fusion
- No risk of decay since titanium doesn’t deteriorate
- Preserved jawbone through continued stimulation
- Independent function without affecting adjacent teeth
Understanding these anatomical differences helps explain why dental implants have become the gold standard for tooth replacement in modern dentistry.
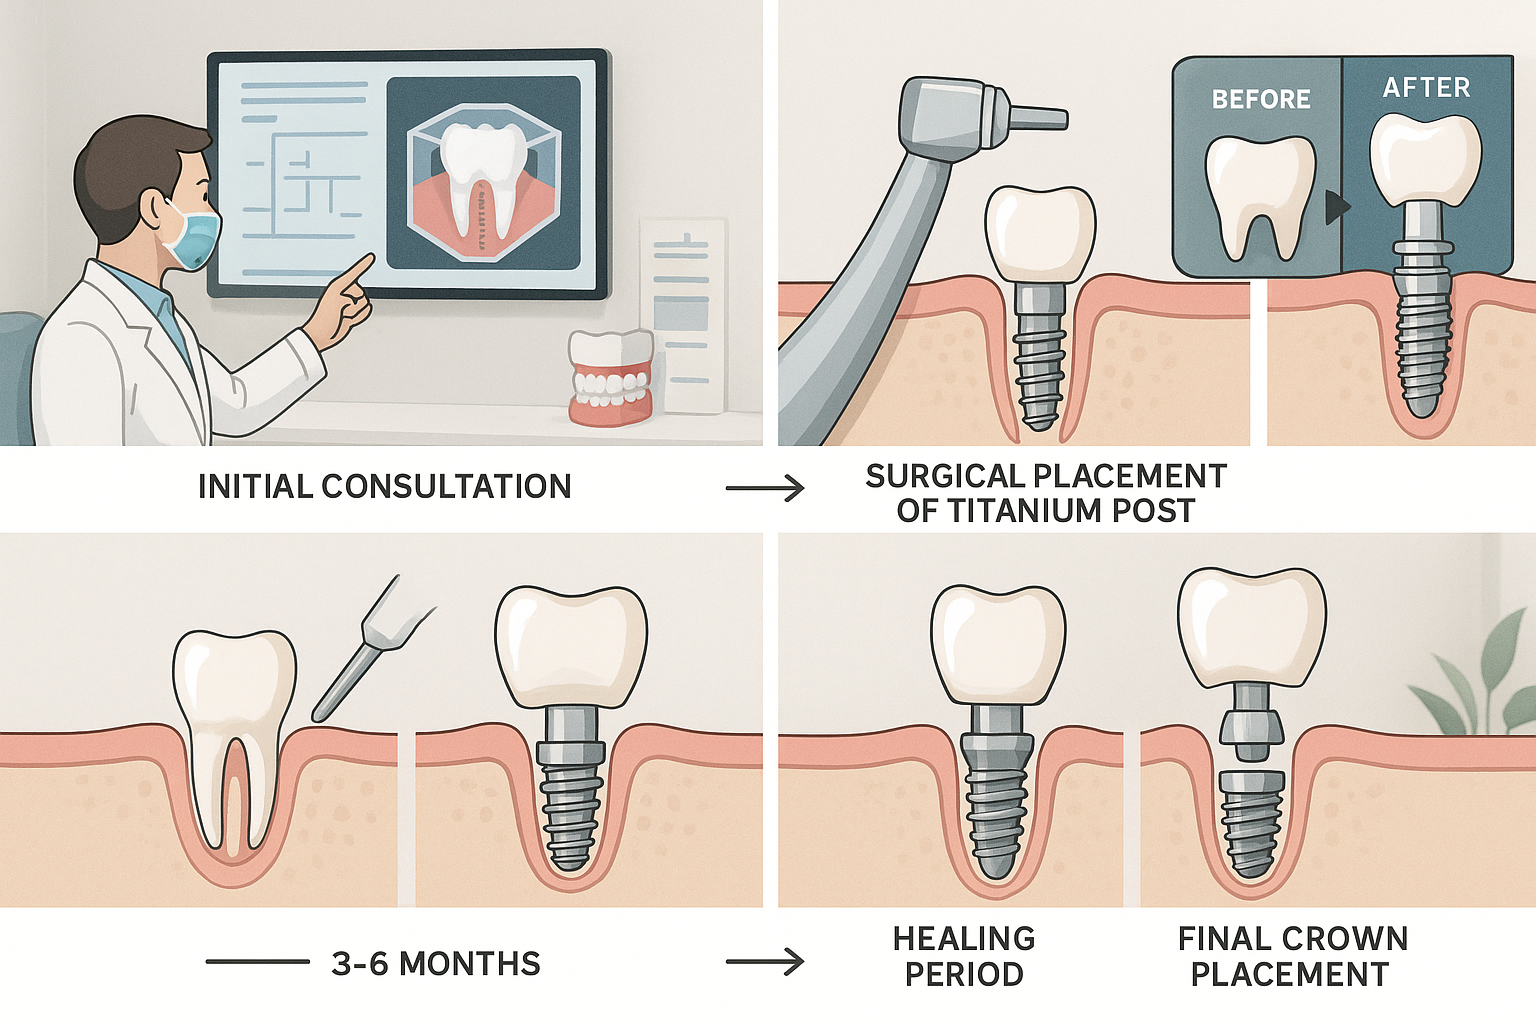
The Step-by-Step Dental Implant Diagram Process
Visualizing the implant placement process through detailed diagrams helps demystify what many patients consider a complex procedure. Let me walk you through each stage using the visual roadmap that dental professionals rely on.
Phase 1: Initial Assessment and Planning
The journey begins with comprehensive imaging and treatment planning. CT scans and dental implants work together to create precise 3D models of your jawbone structure. These detailed images allow your surgeon to:
- Measure bone density and volume
- Identify vital structures like nerves and sinuses
- Plan optimal implant positioning
- Determine if bone grafting procedures are necessary
Phase 2: Surgical Placement
During the surgical phase, illustrated clearly in procedural diagrams, your surgeon creates a precise opening in the jawbone and carefully places the titanium implant. The dental implant diagram shows how the post sits flush with or slightly below the bone surface, allowing for proper healing.
Key surgical considerations include:
- Precise drilling to match implant dimensions
- Controlled depth to avoid anatomical structures
- Primary stability through proper torque application
- Sterile technique to prevent contamination
Phase 3: Osseointegration Period
Perhaps the most crucial phase shown in implant diagrams is osseointegration – the process where bone cells grow around and fuse with the implant surface. This biological integration typically takes 3-6 months and creates a bond stronger than natural tooth attachment.
During this healing period, patients often receive temporary teeth during implant healing to maintain aesthetics and function. The dental implant recovery process requires careful attention to:
- Oral hygiene maintenance around the surgical site
- Dietary modifications to protect the healing implant
- Regular monitoring through follow-up appointments
- Lifestyle adjustments like avoiding smoking
Phase 4: Abutment Placement
Once osseointegration is complete, a minor procedure attaches the abutment to the implant post. Abutment placement involves reopening the gum tissue and connecting the intermediate component that will support your final crown.
Phase 5: Crown Fabrication and Attachment
The final stage involves creating and attaching your custom crown. Modern abutment-supported porcelain ceramic crowns provide exceptional aesthetics and durability, completing your tooth replacement journey.
Interactive Dental Implant Diagram
Click on any component to learn more about its function
Types of Dental Implant Diagrams and Their Applications
Different types of dental implant diagrams serve specific educational and clinical purposes. Understanding these variations helps both patients and dental professionals communicate more effectively about treatment options and expectations.
Single Tooth Implant Diagrams
The most common type of dental implant diagram illustrates single tooth replacement. These detailed visuals show how one implant can replace an individual missing tooth without affecting adjacent healthy teeth. Unlike traditional bridges, single implants preserve neighboring tooth structure while providing superior long-term stability.
Multiple Implant Configurations
For patients missing several teeth, diagrams illustrate various multiple implant options:
All-on-4 Dental Implants
All-on-4 dental implants use four strategically placed implants to support a full arch of replacement teeth. The diagram shows how angled posterior implants maximize bone contact while avoiding anatomical structures.
All-on-6 Systems
All-in-six dental implants provide additional stability through six implant points, offering enhanced support for patients with greater bone density or specific anatomical considerations.
Specialized Implant Diagrams
Zygomatic Implants
For patients with severe upper jaw bone loss, zygomatic implants anchor into the cheekbone rather than the jaw. These specialized diagrams show the unique placement technique and extended implant length required.
Mini Dental Implants
Mini dental implants have a smaller diameter and are often used for denture stabilization or in areas with limited space. Diagrams illustrate their simplified placement procedure and immediate loading capabilities.
Bone Grafting Integration Diagrams
When insufficient bone exists for implant placement, dental implant diagrams often include bone grafting procedures. These illustrations show:
- Sinus lift procedures for upper jaw augmentation
- Ridge augmentation for width and height restoration
- Socket preservation following tooth extraction
- Healing timelines for dental bone graft healing
Understanding bone graft recovery for dental implants helps patients prepare for extended treatment timelines when additional procedures are necessary.
Reading and Interpreting Dental Implant Diagrams
Learning to interpret dental implant diagrams empowers you to actively participate in treatment planning discussions with your dental team. These visual guides contain valuable information about your specific case and treatment approach.
Key Elements to Identify
Anatomical Landmarks
Professional diagrams clearly mark important structures like:
- Mandibular nerve in lower jaw placements
- Maxillary sinus in upper jaw procedures
- Mental foramen and other nerve pathways
- Cortical bone density measurements
Measurement Specifications
Quality dental implant diagrams include precise measurements:
- Implant diameter (typically 3.5-6mm)
- Implant length (usually 8-16mm)
- Bone density classifications
- Angulation for optimal placement
Understanding Treatment Phases
Comprehensive diagrams illustrate the complete treatment timeline, helping you understand what to expect during each phase. This includes:
Pre-surgical Planning
- Initial consultation and examination
- CT scan and dental implants for 3D planning
- Treatment option discussions
- Cost estimates and insurance considerations
Surgical Phase
- Implant placement procedure
- Immediate post-operative care
- Dental implant recovery timeline
- Potential complications and management
Healing and Integration
- Osseointegration of dental implants process
- Follow-up appointment schedules
- Temporary restoration options
- Activity restrictions and dietary guidelines
Final Restoration
- Abutment placement procedure
- Crown fabrication and fitting
- Bite adjustment and final polishing
- Long-term maintenance instructions
Quality Indicators in Diagrams
Professional dental implant diagrams should include:
✅ Accurate anatomical proportions
✅ Clear component labeling
✅ Measurement specifications
✅ Treatment phase indicators
✅ Risk factor annotations
✅ Alternative treatment comparisons
Maintenance and Long-term Care Through Visual Guides
Understanding long-term implant care through visual guides ensures your investment in dental implants provides decades of reliable service. Dental implant diagrams specifically designed for patient education illustrate proper maintenance techniques and potential complications to watch for.
Daily Care Visualization
Effective maintenance diagrams show proper cleaning techniques for dental implants, including:
Brushing Techniques
- Proper brush angle around the implant crown
- Best toothpaste for implants selection
- Gentle circular motions to avoid tissue irritation
- Frequency and duration recommendations
Interdental Cleaning
- Interdental brushes for implants sizing and technique
- Water flosser use for dental implants
- Traditional floss adaptation around abutments
- Flossing dental implants without damaging tissues
Professional Maintenance Schedules
Visual maintenance guides illustrate the importance of regular dental implant checkups and professional care:
Routine Monitoring
- 3-month intervals for the first year
- 6-month maintenance visits thereafter
- Annual comprehensive evaluations
- X-ray monitoring for bone levels
Professional Cleaning
Understanding dental implant cleaning costs in Dallas helps budget for ongoing maintenance. Professional cleaning includes:
- Specialized instrument use around implants
- Biofilm removal from implant surfaces
- Tissue health assessment
- Occlusion (bite) evaluation
Recognizing Potential Issues
Educational diagrams help patients identify signs of dental implant failure and when to seek professional attention:
Warning Signs Include:
- Persistent pain or discomfort
- Gum inflammation around the implant
- Mobility or looseness
- Changes in bite alignment
Early recognition of peri-implantitis symptoms through visual education can prevent serious complications and preserve your implant investment.
Conclusion
Understanding dental implant diagrams transforms what might seem like a complex dental procedure into a clear, manageable treatment journey. These visual guides reveal the sophisticated engineering behind modern tooth replacement, from the titanium post that integrates with your jawbone to the custom crown that restores your smile’s function and beauty.
Whether you’re considering a single tooth replacement or exploring full mouth solutions, visual education empowers you to make informed decisions about your oral health. The detailed anatomy, step-by-step procedures, and maintenance guidelines illustrated in professional diagrams provide the knowledge foundation for successful implant treatment.
Your Next Steps:
- Schedule a consultation to discuss your specific needs and review personalized treatment diagrams
- Request 3D imaging to visualize your unique anatomy and treatment plan
- Review maintenance protocols to ensure long-term implant success
- Ask questions about any aspects of the diagrams you don’t fully understand
- Consider your options including timeline, costs, and alternative treatments
Remember, every successful implant journey begins with education and understanding. Use the visual guides and diagrams as your roadmap to restored oral health and renewed confidence in your smile.
Leave a Reply
Share your thoughts or ask a question about dental implants. Your email address will not be published.